Mounting a Flashlight for Mammal Watching
Mounting a Flashlight for Mammal Watching
This article describes how to mount a flashlight for nocturnal mammal observation with a (Svarosvki) telescope and on a (Sony) camera system.
Telescope Mounting
There are obvious difficulties when trying to use a telescope for nocturnal mammal spotting whilst holding a flashlight to illuminate the subject. The solution that works for a hand-held camera as described below is not possible as in just about all cases, the telescope mounting has to be used for a tripod.
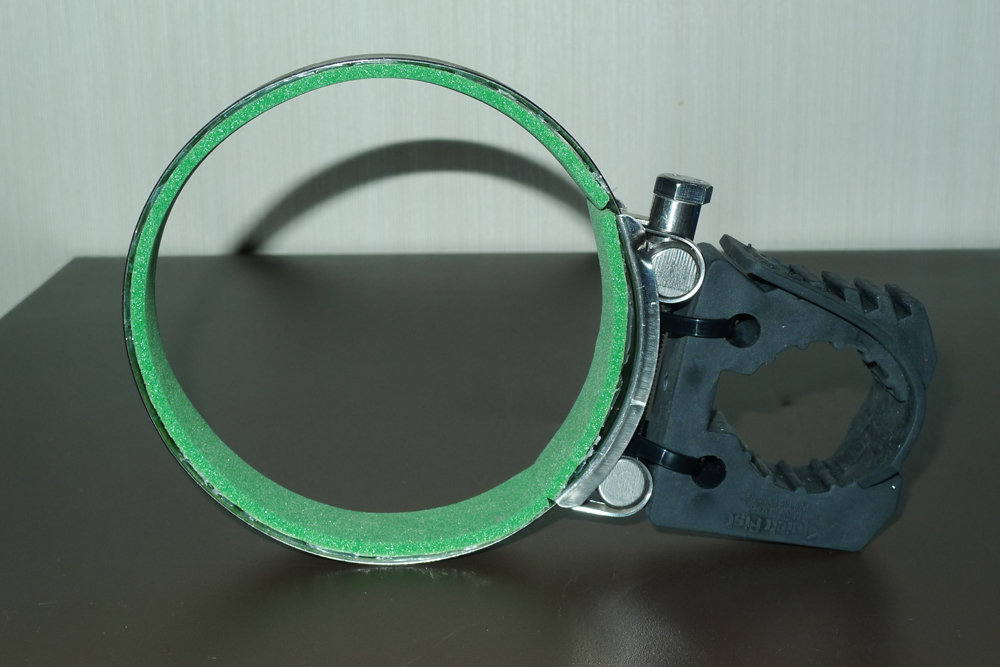
The flashlight has to be connected directly to the telescope so that the beam illuminates the field of view. Realistically, the only way to do this is to use the sliding lens collar at the front which will always be parallel. The flashlight can be mounted using a combination of a large ring clamp and a rubber connector.
The automotive market offers stainless steel ring clamps in sizes considerably larger than the average Jubilee clip; these are designed for connecting large hoses. They have the advantage over the Jubilee type of clip in that they tighten in an even manner from both sides and do not dig in and do damage. For my telescope I selected one designed to work with diameters from 113mm – 121mm ; plenty of other size ranges are available. Allow a little over the collar diameter as you should glue a strip of closed cell foam material or rubber around the inside of the clamp to prevent it from damaging your telescope. In my case, the depth of the clamp is 24mm which when tightened gives it sufficient stability.
The flashlight is held using an adjustable rubber clamp; I used a type branded Quick Fist which comes from the USA and is available via the usual Internet based sources in a variety of sizes. The real use for these is again automotive, for attaching items to the outside of your 4×4 vehicle for instance. The rubber clamp is attached to the hose clamp using two or three reasonably large cable ties.
The system will work with the flashlight at 12 o’clock on the telescope, i.e. above it and also at 6 o’clock, i.e. below it. Depending on the size of the flashlight you may have to make some adjustment arrangement in order to get the beam in line with the field of view. The only real disadvantage is that the whole rig is front-heavy and will tend to fall forward on the tripod mount.
Camera Mounting
Firstly, this was not my idea; the use of the lens foot for mounting a flashlight was reported quite recently on mammalwatching.com. These notes refer specifically to a Sony 100-400mm G Lens. It seems that the lens foot supplied with the lens is not available as a spare part but I did locate a pattern part – IS-THS140 manufactured by IShoot (Shenzhen Photoloving Photographic Equipment Co. Ltd.). This is available in the UK via a distributor but it can also be ordered directly from sources in China. The quality of manufacture is very high and the item is perfect fit to the Sony lens. Similar lens feet are available for other lenses, it is just a case of looking around.
Once again, a rubber Quick Fist clamp is used, and this time it can be attached to the lens foot with a ¼” UNC bolt.
Disclaimer
The usual disclaimers apply. I have no connection with any of the manufacturers mentioned in this article and do not stand to gain in any way from my comments or recommendations. I believe all that I have said here to be factually correct, but readers should check carefully on specifications and other data before purchasing and I apologise for any errors.
Chris Grimmett
January 2019
Leave a Reply
You must be logged in to post a comment.